When you need to do a quick layout, it's easy if you're using the beautiful Chasing Dreams collection from Crate Paper by Maggie Holmes! I'm here today to share a layout, that took about 20 minutes from start to finish!
I went with all patterned paper for this layout and a simple grid design. Using the phrase patterned paper for the full background, makes it look like more work went into the layout. I cut 3.5x3.5 inch squares from the 6x6 paper pad to create a grid in the center of the layout. Then I machine stitched around each of the edges, for added texture.
I used the fringe butterflies in the center of each of the patterned paper squares, to fill the space with a large embellishment. Then I used the chipboard phrases for my title. To finish the layout, I added a few stickers, gold heart and button.
I loved putting this layout together, and it just goes to show, that we don't have to spend hours on a layout to get a great end result!
This post contains affiliate links, which means I will receive a small commission from any purchases made from product clicks on this post. PRODUCTS USED:
Thanks for all of your sweet comments on the giveaway of my new collection, Ain't Life Grand, with Pretty Little Studio!! It's time to announce the WINNER of the Giveaway!
CONGRATS RAECHELLE BELLUS!
"This
is so vibrant and full of fun! I love the colors, the prints, the cork
hearts, and the Die Cut Love Life Words are super cute! Congratulations
on another outstanding collection, Ashley!"
Raechelle, please contact me at ashleyhorton010675@gmail.com for information on receiving your prize.
I love reading all of the comments from you guys, during the Altenew Release Blog Hops! They are always so encouraging and sweet! It's time to announce the $30 Gift Certificate Winner from my Blog!
CONGRATS SHARON KLUMPH!
Sharon, please contact Altenew by 4/30/2017 at winner@altenew.com with the subject line Altenew March Release Blog Hop Winner from Ashley's Blog.
Hi there! It's me again, with a bit more gushing over Traveler's Notebooks! You're probably tired of hearing about it, but I've finally received my Notebook, and I got to create my first spread! :) I also designed a Traveler's Notebook collection for The Cut Shoppe, called Fresh Air. The papers are sized to 8.5x5.25, and there are a total of 55 printable pieces. Make sure you read all the way to the end of the post for more information, and check out the download for the FREE Road Rules printable set.
Most of what I used, is from the Fresh Air Printable collection. I added in some Washi Tape from Pinkfresh Studio and Simple Stories. I also used a paper clip from Webster's Pages, that I clipped to my photo. The stamps I used are a fun Alpha set from Studio Calico, and I also used a Color Theory ink pad and the Jet Black ink pad from Altenew.
I am so excited with the way my first spread turned out. It will take a little time to get used to working with a smaller size, since I typically create 12x12 layouts. I have a new process video to go along with the post too, so make sure you check it out!
If you want to grab the Fresh Air Printable collection, head over to The Cut Shoppe Etsy Store. It's $5.00 and includes 6 printable papers, as well as 3 cut out sheets, for a total of 55 pieces. You can get the collection at a discounted price through Friday, March 17th, when you check out with the DISCOUNT CODE BLOGHOP30!
And before you go, I have another FREEBIE to share with you! This is a travel set, and you can download it by clicking on the Road Rules graphic below. All four colors are included with the download.
I hope you're enjoying these FREE Printables, and in case you missed the first one, you can download Food Fight, HERE.
If you are using any of the Printables in your Traveler's Notebook or for any of your other crafty projects, I would love to see! Make sure you tag me @ashleyhorton75 if you're posting on Instagram!
Happy Monday friends! The wait for my third collection, Ain't Life Grand, for Pretty Little Studio is over! It's NOW available for Pre-order in the PLS Shop!
Here are a few (or a lot) of my favorite things from the collection!
Now, head over to the Pretty Little Studio Shop and check out the full collection. Then come back and leave me a comment letting me know your favorite item or items from the collection, and I'll have a small giveaway for one lucky WINNER!
Happy Weekend everyone! I have currently become obsessed with the idea of Traveler's Notebooks. Call me crazy...because I don't even have my stuff yet...but I am super excited about working in a TN! I'm so excited, that I even decided to make some FREE Printables to share with you!
This first set of Printables is a foodie themed set. I LOVE taking photos of my food, so I thought this would be a perfect first set. I don't always feel like creating a full 12x12 layout with a photo of my food, but I think the TN will be a great way to document the food photos I snap to share on Instagram.
So here's the deal! Click on the Food Fight graphic below for the FREE Download. The files are saved as a PNG image. And I even have four different color selections for this design.
You can use this Printable set in your Traveler's Notebook, Planner, PL spreads, Layouts, Cards and even digitally! I hope you enjoy it! If you're using any of the designs in your projects, I would love for you to tag me if you're posting on Instagram @ashleyhorton75.
Let me know if there are any suggestions you have for Printable sets, and I'll see if I can accommodate!
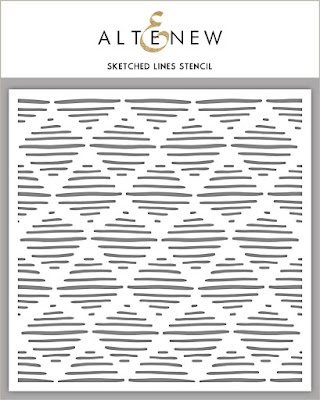
Welcome to the Altenew March Release Blog Hop! Today Altenew is releasing Stencils and Ink Sprays. You can find the new releases in the Altenew shop! You should have arrived here from the talented Therese Calvird's Blog. I used the Sketched Lines Stencil and all of the Ink Sprays on the layout I'm sharing today!
I started my layout, by dabbing the Ink Spray colors through the Sketched Lines Stencil onto White card stock. Once I finished all of the colors, I cut each of the shapes out and arranged them on a new piece of White card stock.
After all of the diamond shapes were adhered to my background, I machine stitched through each one. I wanted to add more texture to the background, so I also added hand stitching around some of the shapes. Then I used each of the Ink Sprays to splatter color around the coordinating diamond shapes from the stencil.
The embellishments and papers from the Reflection Scrapbook Collection coordinated perfectly with the Ink Spray colors. I clustered embellishments around my photo and I used the Bold Alphabet Die Set to create the title for my layout.
I hope you've been inspired by my layout, with some fun ideas for using the new Altenew Stencils and Ink Sprays! Don't forget to visit the Altenew Shop to check out all of the new products!
#1 - To celebrate this release, Altenew is giving away a $50 gift certificate to THREE lucky winners! Please leave a comment on theAltenew blog by Thursday, March 16th at 11:59 pm EST for a chance to win. The winners will be announced on the Altenew blog on Friday, March 17th.
#2 - I am giving away a $30 Gift Certificate to the Altenew Shop. Just leave a comment below and a random winner will be selected and announced on my Blog on Thursday, March 16th. The Winner will need to contact Altenew by 4/30/2017 at winner@altenew.com with the subject line Altenew March Release Blog Hop Winner from Ashley's Blog.
Now, it's time to continue on the Hop! You're off to the talented Nicole Picadura's Blog! Here's the full Hop list, in case you haven't had a chance to start the Hop from the beginning:
Today, I'm stopping in to share my first layout with my Ain't Life Grand, that's coming to the Pretty Little Studio shop soon...hopefully next week!! Starting this month, I'll be sharing two posts on the PLS Blog, and bringing you inspiration using my collections. I had to get creative with my first layout, because I only had part of the collection...Journaling Cards and Die Cuts.
I decided to use one of the Cloud Nine 6×4 Pocket Cards and and a couple
of the Hello Today 3×4 cards as my patterned paper. Before adding the
cards to my background, I drew the words Too Cute on my White card stock
with the Silhouette Sketch Pens and then hand stitched over the title.
I also added machine stitching to the cards, before placing them on the
layout.
I placed my photo over the Journaling Cards and also brought in one of
the Easy Breezy Shipping Tags for more layering. Next up, it was time
to add some of the fun die cuts! I used a mix of pieces from the
Document This pack, the Bloomin’ Blooms pack and the Framed pack. When
I’m using die cuts on my layouts, I like to use pop dots with some of
the pieces to add a dimensional look on the layout.
I wanted to add some textural embellishments to the layout, but not
having any from the collection yet, I had to turn to my scrappy stash. I
used some enamel dots and a paper clip arrow, that coordinated with the
colors in Ain’t Life Grand. I also grabbed one of the Flair Buttons
from my Tinsel Town collection, that went with the colors in the
layout. I love it when you can mix items from different collections! I have a process video to go along with my layout, showing how everything came together. You can check it out here!
I can’t wait for the Ain’t Life Grand collection to be available in the
Shop! I hope you’ve found some inspiration from my layout today, and
that you’re looking forward to picking up some of this bright and happy
collection!
I’m stopping in today to share an idea with you for DIY Flowers, using the Reflection Scrapbook Collection
from Altenew. The rosettes from the die cut sheet didn’t last long, after I received
the Reflection Collection! They were so pretty, and I just had to use
them right away. As I was looking through the collection recently, I
thought it would be fun to use the negatives from the rosettes on the
die cut sheet and trace them onto patterned paper from the collection.
Here’s what I did:
Place the die cut sheet over your choice of patterned paper and trace the flower shape.
Repeat the process with the leaves and then cut out all of your pieces.
Use adhesive to adhere the leaves to the flower shape.
Machine stitch on your flowers to add texture and interest.
You could create several different floral looks, just by changing out
the patterned paper you use. I added interest to the flowers, by
adhering them to the background paper and also using pop dots to create
dimension and layers. The messy machine stitching also adds definition
to the flowers and leaves.
Once my flowers were completed, I clustered them around my photo. I
brought in other elements from the Reflection Collection around my photo
as well. Mixing chipboard pieces, stickers and wood veneers brings
great texture to a project. The Black alphas worked perfectly for my
title and brought a nice contrast to the softer colors from the
patterned papers I used. I continued the Black contrasting, with a
finishing touch of splattered spray mist.
If you would like to see how everything came together for this layout, you can check out my newest process video.
This post contains affiliate links, which means I will receive a small commission from any purchases made from product clicks on this post. PRODUCTS USED:
Make sure you visit the Altenew website to check out all of the promotions that are happening right now!!
This week, the Pink Paislee Design Team has been sharing a look at our craft spaces. I kicked things off earlier this week with a tour of my craft area. My craft space is in the master bedroom and has been for many years
now. It’s been a functional space over the years, but because of the
small size, I never really invested time into making it a stylish space.
But this past December, I decided to do something about that!
I’ll start out with everything at my desk area. And if you’re wondering
if it is always this clean, the answer is YES! HA! The kids wreak havoc
on the rest of the house, so I love keeping my own little area of the
world neat and organized. The only time you will find it messy is when
I’m working on a project and if I have to leave a project unfinished for
a while. But as soon as I’m done I always clean up, even if I plan on
starting a new project.
Let me just tell you, if you can do it, put up peg boards for storage!
It’s awesome! I love having it on the wall over my desk. I keep things
close at hand that I use frequently when I’m working. And it’s
functional and cute! You can hang wire baskets for storage, a screw
driver holder turns into great scissor storage, and you can even display
things like mini albums by hanging them on your peg board.
I also like to keep my current design team collections nearby, so I
store them in the knock off Ikea cart next to my desk, along with the
notebooks I use on a daily basis. And pencil/pen storage is a must. I
picked up this wooden “bottle” container at Michael’s and it’s perfect
for storing my favorite mechanical pencils and a few small scrapbooking
tools.
For more storage, I have a shelf above my desk that is attached over my
peg board… thank goodness for a handy hubby! I have a mix of products,
photos, and decorative items that I keep on the shelf. And the brackets
that hold the shelf in place are perfect for stringing thin wire and
creating a photo line across the bottom of the shelf. Can you tell by
now what my favorite colors are in my craft space??!!
I have an OLD table that used to serve as the table for my sewing
machine until I made room for it on my desk because I used it so much. I
turned the table into a space for things like my Silhouette Sketch
Pens, roller stamps, flair buttons, and stamp paraphernalia. Recently, I
decided to purchase contact paper that looks like butcher block and I
used it to cover the top of the old table and also to cover the 8 foot
white table that I use for my desk. I took some inspiration from Paige
Evans and I have a small empty wall area that serves as a display for
some of my favorite layouts.
I have two, large wire shelving units that are placed on opposite
walls that make for great storage. I like to keep my collections in 13
inch Zip Lock bags to keep things all together and I store those
collections by manufacturer in 13×13 boxes. I also have several white
photo boxes that hold our photo CD’s, any loose photos, and small
miscellaneous items that I may need. I keep a good bit of my scrapbook
albums on the larger of the two shelves, but have recently slacked on
putting layouts in albums. I probably have at least 150 layouts that are
not in albums. I know… the horror!! I decided it would be fun to create a video tour to go along with the
photo tour, so you can check out my video for more on my Craft Room!
I hope you’ve enjoyed a look into my craft room! It’s a small space, but
fits my needs perfectly! My advice to any of you that don’t have a
separate craft room is to make what you have your dream space. With a
bit of paint, a trip or two to the hardware store, and helpful hands, my
space is just what I want it to be and I love sitting down at my desk
to make pretty things!