Happy Halloween everyone! I can't let Halloween go by without sharing some fun Halloween layouts! There are some awesome Halloween themed products in The Cut Shoppe Etsy store, and I decided to use the Halloween acrylic piece for one layout and the Ghost Town Digital/Printable collection for a second layout.
I used the Crate Paper After Dark for this layout, and made the Halloween acrylic part of my title. I only had one full sheet of the After Dark collection left, but it wasn't what I was looking for on this layout. So, I cut all of my scrap pieces into 3x3 squares and created my own background paper for the layout!
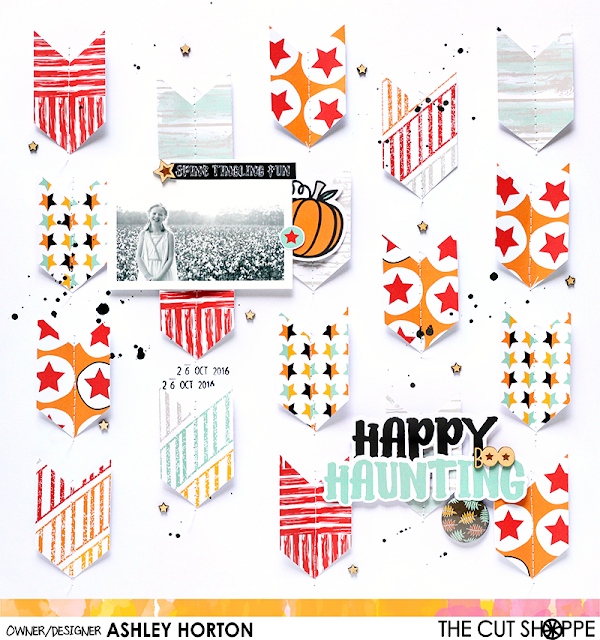
My second layout uses the Ghost Town Digital/Printable collection from The Cut Shoppe. I love these collections, because you never run out of your favorite pieces. If you need one of your favorite papers or embellishments, just print it out again! And if you're a Digital Scrapper, you've got everything you need for an amazing layout!
I had several of the papers from the collection printed at 6x6, so I cut them down to create some chevron pieces for the background. I placed them offset over the White cardstock and then stitched down the center of each one. I folded up the edges of each chevron, to create a dimensional look on the layout. I also added some of the Ghost Town embellishments and a few wood veneers from the Happy Halloween wood veneer set!
If you're looking to stock up on some Halloween products or any of your favorite products from The Cut Shoppe Etsy store, make sure you head over today! It's the last day to save 31% off of your entire purchase!!
And don't forget there's still time to entire my GIVEAWAY before it ends tonight! You can check it out HERE!
I'm still making my way through the Oakley Avenue collection, and I had some time to create a new layout earlier this week. I wanted to work with the Leaf Pile cut file from The Cut Shoppe, and mix it with some products from the Oakley Avenue collection. And there's something really unusual about this layout...I didn't use any patterned paper! That's something I haven't done in a long, long time!
Since the papers in the Pretty Little Studio collections are not sized to 12x12, I decided to use a White cardstock background for this layout. Then I cut the Leaf Pile 12x12 background from a second sheet of White cardstock. Initially, I thought I might add in some patterned papers behind the cut file or add some watercolor, but in the end, I really loved the White on White look.
I decided to go with some of the embellishments from the collection, to bring in pops of color. The Fall Florals stickers were the first thing I grabbed. I knew the Red and Yellow colors on the flowers would look great against the White background. I mixed some of the wood veneers, stickers and fussy cut leaves around the photo, to create a fun visual triangle.
And for some extra pops of color, I finished the layout with some scattered Harvest Pumpkin sequins! I really loved the final effect of the pops of color against the White background paper and cut file!
You can check out the full Oakley Avenue collection, by heading over to the Pretty Little Studio website!
How would you like to win a selection of products from the Oakley Avenue collection??!! I'm giving away some selected products to one lucky winner!
HOW TO ENTER:
Make sure you are following my Blog.
Leave a comment below and let me know what is one of your favorite items from the Oakley Avenue collection!
I will announce one random winner on the Blog, on Tuesday, November 1st, so make sure you check back to see if you're the lucky winner!
This
post contains affiliate links, which means I will receive a small
commission from any purchases made from product clicks on this post.
PRODUCTS USED:
This
is a personal blog. All editorial content and projects are
intellectual property of ashleyhortondesigns.com. I do receive
compensation and material product from Crate Paper to develop my craft
posts, but all ideas and opinions are my own.
It's almost Halloween, and I'm here today to share a new layout using the Cool Kid collection from Crate Paper. I know I’ve said it before, but I love how versatile this
collection is. I’ve already used it for everyday layouts of our son,
travel themed projects, a back to school layout, and now I’m using it
for a Halloween layout!
Last year, our son wanted to be The Flash for Halloween. The colors in
the Cool Kid collection coordinated perfectly with the colors in his
costume. I decided to go with a full patterned paper background and
used the Handsome patterned paper. I really liked the look of the Red
and White stripes in the background. Since I had a lot of Red in the
photo, I needed to break up the striped pattern a bit, so I layered the
Boys Club patterned paper behind the photo.
The Play Thickers worked great for the title of my layout. I loved the
contrast of the wood letters against the Black patterned paper. I also
wanted to repeat the word brave on the layout, since our son was a
superhero. I used a mix of the Puffy Phrase & Accent Stickers and
Pennants. And I loved that the Puffy Phrase & Accent Stickers and
Wood Embellishments both included a lightning bolt. They are a fun
complement to The Flash costume!
Most of my embellishments are clustered around the photo, so I decided
to create a scattered look on the layout, using some of the stars from
the Embellishment pack. I randomly placed them around the layout and
adhered them with liquid adhesive. Then I sprinkled on some Black Color
Shine to emphasize the scattered look.
The Cool Kid collection worked great for a Halloween layout, even though
it’s not a Halloween themed collection. Think of fun ways you can use
the Cool Kid collection to focus on your child’s costume, on your next
layout!
This post contains affiliate links, which means I will receive a small commission from any purchases made from product clicks on this post.
PRODUCTS USED:
It's a little too early to wish you a Merry Christmas, but it's not too early to check out my newest collection, Tinsel Town with Pretty Little Studio! It's perfect for documenting your Christmas photos on layouts, for your Christmas Daily albums, decorating your December Planner spread and more! The collection is available for Pre-Order right now on the Pretty Little Studio website. Pre-orders are taking place now through November 5th.
Here's a look at some of the products you'll find included in the Tinsel Town collection...but make sure you check everything out on the PLS website, because there's so much more!!
While you're checking out the Tinsel Town collection, don't forget to take a look at Oakley Avenue, if you haven't had a chance to pick it up yet! It's been so awesome to see all of the amazing projects you've created with Oakley Avenue, and I can't wait to see how you use Tinsel Town!
One of my favorite designs in any scrapbook collection would have to be
florals! You can use flowers or floral designs in such a variety of
ways. I used some of the floral papers and embellishments from the Pink Pasilee Take
Me Away collection to create a fancy, floral card set.
For my first card, I wanted to include a couple of the pretty chipboard
flowers from the chipboard stickers included in the Take Me Away
collection. I cut white cardstock to fold to a 4.25×5.5 card base. Then I
cut one of the patterned papers from the collection to fit the front of
the card. I used my adhesive roller to adhere the patterned paper to
the cardstock base. Next I placed the two chipboard flowers in an offset
position on the card. I used the word “smile” from the foam Thickers as
the sentiment of my card. I also incorporated one of the cute paper
clips that resembled a floral design and clipped it to the top of the
card.


On the second card, I decided to just use the white cardstock as the
base of my card. I fussy cut a large floral design from one of the Take
Me Away patterned papers and added it to the center of the card. I
really liked the contrast of the navy outline from the patterned paper
against the white card base. Since the floral design was on the large
side, I was able to add my sentiment directly over the fussy cut flower.
I layered the “Wild Heart” from the foam Thickers over the flower for
the card sentiment. And I finished my card with one of the chipboard
embellishments and cute bows included in the collection.
Try some floral designs on your next hand-made cards, or any of your paper crafting projects.
PRODUCTS USED:
This
is a personal blog. All editorial content and projects are
intellectual property of ashleyhortondesigns.com. I do receive
compensation and material product from Crate Paper and Scrapbook.com to develop my craft
posts, but all ideas and opinions are my own.
I can't use the Crate Paper Gather collection by Maggie Holmes, enough! It's so beautiful and perfect for feminine layouts. I started this layout by looking through the 12x12 patterned papers for some inspiration. The Happy Place paper caught my eye, and inspired me to do a fun title design.
I really liked the calendar look of the background paper, so I printed my photo to fit in the last two columns on the page. Then I had the idea to flip the words for my title in a vertical design, to span the other daily columns on the background paper. I used a mix of the Blessed Chipboard Phrase stickers, Together Thickers and die cut words to create the long title.
You might notice something a little unusual on this layout...for me, anyway...there is a minimal amount of embellishing! I really liked the clean look of the layout, once I had the photo and title in place, so I decided to go with less embellishing than I normally use. The beautiful leaves from the Gather Ephemera pack were perfect for balancing the large title. Then I used a couple of the leaf stickers from the Accent Stickers pack, with a wood button to create a small cluster on the opposite side of the layout.
This was a fun design, and I liked that it was a bit different than what I normally do. Don't be afraid to try out new design styles, especially if you are in a creative rut. Trying something new can kick start your creativity, or help you find new ways to use your supplies!
SUPPLIES USED:
Scrapbook.com: Thousands of scrapbooking supplies. HUGE daily discounts!


