Monday, November 30, 2015

Hip Kit Club | Christmas Joy

This is a personal blog. All editorial content and projects are intellectual property of ashleyhortondesigns.com. I do receive compensation and material product from Hip Kit Club to develop my craft posts, but all ideas and opinions are my own.

I didn't get a chance to post my Hip Kit Club layout from last week, because of the Thanksgiving holidays, so I thought I would stop in and share it today.


I love all of the fun things we have going on each month at Hip Kit Club! Did you know we have FREE cut files and Weekend Challenges every week in the Hip Kit Member Forum??!! This week's challenge is based on a Sketch, and I used it as inspiration for my layout created with the November Hip Kit & Add-On Kits, along with some of the cut files by Nicole Nowosad! I mixed the exclusive papers and embellishments in this month's Kit, created by Kim Watson, with some of the Pinkfresh Studio Christmas Wishes collection, also included this month. Since I used a White card stock background, I created a busier design with the die cut circles, to create a fun look for the page. I finished the design, with a large title, using the Maggie Holmes Thickers included in the November Embellishment Kit.

And make sure you check out the Hip Kit Club website today!  There's an awesome Cyber Monday Sale, that you don't want to miss!!


http://www.hipkitclub.net/


https://www.etsy.com/shop/TheCutShoppe

Wednesday, November 25, 2015

Simple Stories | Be Thankful Always

This is a personal blog. All editorial content and projects are intellectual property of ashleyhortondesigns.com. I do receive compensation and material product from Simple Stories to develop my craft posts, but all ideas and opinions are my own.
 
I love this time of year!  November means Fall weather, Thanksgiving, spending time with family and a lot of delicious food!  It's a time to be THANKFUL.  But it doesn't mean it's the only time for us to be thankful.  We can be thankful everyday and in everything.  I wanted to document an everyday kind of thankful on these layouts that were on the Simple Stories Blog earlier this week.  These are just everyday photos, but they can easily be used with the We Are Family collection to create a thankful themed layout.
 
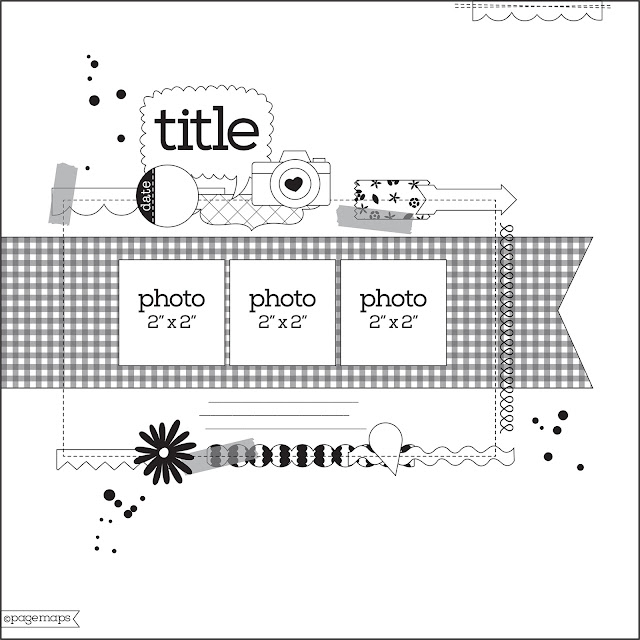
I started my first layout, We Are Blessed, by cutting a large arrow background from White card stock.  Then I backed the open space with the Our Story patterned paper and machine stitched around the arrows.  I wanted to use the open spaces between the arrows to place my photos, embellishments and title.


I added my two photos first, to give me a starting point for the rest of my design.  Once the photos were in place, I added my title to the top section of the arrows, using the We Are Family wood veneers mixed with a die cut word.  Then I moved on to embellishing the bottom section of the arrows, with a mix of Stickers, Bits, Enamel Dots, Wood Veneers and Bradz from the We Are Family collection.

 
After I have 95% of my layout design finished, I like to go back and add a few other touches.  I wanted to bring some embellishments to the title, so I added a small arrow Sticker, Brad and Bits & Pieces heart with an Enamel Dot in the center.  I also wanted to add a few things to the photos, to help draw your eye.  I kept it simple with a couple of Stickers and Bits & Pieces from the We Are Family collection.


On my second layout, XOXO YOU, I created a large typography graphic by welding several words together in Silhouette Studio.  I wanted to have a thankful themed text in the background of the layout.  I decided to cut the words from the Making Memories patterned paper in the We Are Family collection.  This pattern allowed me to bring in a lot of color, without using a lot of different papers.


Before I added the die cut words to the White card stock background, I created an offset design in Silhouette Studio and drew the outline of the words with a Brown Sketch Pen.  Once the words were finished drawing, I added the die cut words to the drawn image.  And before I added my photo or any embellishments to the layout, I added a few splatters with Brown spray mist.


I didn't want to cover a lot of the background words, so I placed my photo to the right hand side of the page, and added my title above it and some embellishments below it.  And I added a few of the Bits & Pieces, Wood Veneers and Enamel Dots from the We Are Family collection to the left hand side of the page to balance out the layout.


I hope these two layouts have given you inspiration for creating thankful themes, to go with your photos all year long.  The right collection, embellishments and title can bring a thankful look to any of your layouts!

 https://www.etsy.com/shop/TheCutShoppe

Thursday, November 19, 2015

Hip Kit Club | We Believe

This is a personal blog. All editorial content and projects are intellectual property of ashleyhortondesigns.com. I do receive compensation and material product from Hip Kit Club to develop my craft posts, but all ideas and opinions are my own.

It's beginning to look a lot like Christmas, especially if you're using all of the amazing goodies in the November 2015 Hip Kit & Add-On Kits.  We've also got a lot of extra inspiration for you this month, with cut files, printables, a sketch and our November Mood Board.  The layout I'm sharing today, was inspired by the November Mood Board, and I used the Under the Tree background cut file.


I started my layout with a piece of White cardstock from the November Cardstock Add-On Kit.  I wanted it as my background, to make the Christmas trees really stand out.  I ungrouped the cut file in Silhouette Studio, and clicked no cut on the smaller trees.  Then I sent the other tree images to the Cameo, and used the Silver sketch pen to draw the Christmas trees.  I repeated the process and switched the smaller trees back to cut and the triangle shaped trees to no cut, and then sent the cut job to the Cameo and cut the trees from one of the exclusive patterned papers, designed by Kim Watson.


Once the trees finished cutting, I laid the patterned paper over my White cardstock and used the negative spots to add the die cut trees back in place.  Then I got to work on the string art trees, which were inspired by the stitched deer on the November Mood Board.  I used my paper piercer to poke holes along the sketched trees and then stitched each one a different color, using 5 colors of embroidery floss.


I didn't want to over embellish and cover a lot of the background, so I layered my title close to the photo.  Then I used some of the Pinkfresh Studio die cuts from the November Main Kit to embellish the layout.  And you will notice, I created a visual triangle, with the design, by adding three different clusters on the page.  I love the top cluster with the cute flair button, designed by Kim Watson, from the November 2015 Embellishment Kit!

There's still lots of Christmas cheer coming your way!  And speaking of Christmas, now would be a great time to mention a Hip Kit Club Subscription to Santa!  You'll definitely want it on your wish list, after you pop over to the website and take a look at the new December 2015 Hip Kit & Add-On Kits!  It's so awesome, Santa might even keep it for himself!
https://www.etsy.com/shop/TheCutShoppe

Wednesday, November 18, 2015

A Flair for Buttons | Selfie Smiles

This is a personal blog. All editorial content and projects are intellectual property of ashleyhortondesigns.com. I do receive compensation and material product from A Flair for Buttons and American Crafts to develop my craft posts, but all ideas and opinions are my own.

You can't go wrong with Gold!  It matches everything, and that's why I decided to use the LOVE Gold Foil Flair set from A Flair for Buttons on the layout I'm sharing today.  I wanted to incorporate the Flair Buttons into my background design, so I cut the All Heart cut file from The Cut Shoppe on White cardstock.  Then I backed each section of the hearts with various patterned papers from the Finders Keepers collection from Amy Tangerine.


Before adding the Flair Buttons and embellishments, I machine stitched through each row of hearts.  Then I placed my photo in the center of the die cut.  Once the photo was in place, I added the Flair, spacing them out around the heart die cut.  I wanted the Flair Buttons placed on the larger hearts on the outside edges of the die cut, to leave room for smaller embellishments toward the center of the die cut.


I decided to place the title close to the photo, to avoid covering a lot of the background detail.  I chose coordinating Thickers from the Finders Keepers collection for the title.  As a finishing touch to the layout, I stamped the plus sign from the Finders Keepers stamp set in Black ink, in some of the White space of the die cut.  Then I used matching water colors, to add color to the stamped images.


Whether you're looking for Flair Buttons that will match any theme or color scheme, or if you're looking for a specific set to fit your needs, the A Flair for Buttons shop has just what you need!  Stop by for a visit and check out all of the great designs, including the LOVE Gold Foil Flair, I used on today's layout!

https://www.etsy.com/listing/237987944/love-gold-foil-flair?ref=shop_home_active_2


Supplies:  Flair Buttons:  A Flair for Buttons; Patterned Paper, Thickers, Enamel Dots, Flair, Stamp Set & Bits:  American Crafts; Wood Veneers:  Studio Calico; Phrase Stickers:  Tim Holtz; All Heart Cut File:  The Cut Shoppe; Die Cut Machine:  Silhouette Cameo 


https://www.etsy.com/shop/TheCutShoppe

Friday, November 13, 2015

Simple Stories | Carpe Diem Planner November

This is a personal blog. All editorial content and projects are intellectual property of ashleyhortondesigns.com. I do receive compensation and material product from Simple Stories to develop my craft posts, but all ideas and opinions are my own.

I set up the month of November in my Simple Stories Carpe Diem Planner at the beginning of this month, and wanted to stop in and share it on the Blog today!  I can't say how much I love this Planner, and I am very new to the whole Planner scene!  The Planners and coordinating products are on their way to stores soon, so make sure you watch the Simple Stories Blog and Social Media pages for the most recent info!  You won't want to miss out on picking one up!!


There are so many options to fit your needs...month spreads, daily and weekly planning pages, pages for keeping track of inspiring ideas and so much more!

And since I like to plan ahead, I'm not wasting any time on organizing December!  The Claus & Co. collection includes Holiday Planning Inserts, which are perfect for scheduling all of your holiday activities!  I'll be sharing a look at December today on my Instagram, so make sure you're following me and come check it out! 

https://www.etsy.com/shop/TheCutShoppe

Thursday, November 12, 2015

Hip Kit Club | The Christmas Story

This is a personal blog. All editorial content and projects are intellectual property of ashleyhortondesigns.com. I do receive compensation and material product from Hip Kit Club to develop my craft posts, but all ideas and opinions are my own.

WOW! That pretty much sums up the way I feel about the November 2015 Hip Kit & Add-On Kits from Hip Kit Club! There is a great mix of the Christmas Wishes collection from Pinkfresh Studio and a ton of exclusive papers and embellishments! 


I used some of the exclusive papers created by Kim Watson for my background and for the die cut I used, also created by Kim. Then I filled in the circle with my photo and embellishments from the kits. This month's Kit and Add-On Kits are perfect for all of your Christmas layouts, and would even be great in your December Daily!

We've also got some amazing cut files for the month of November, created by Nicole Nowosad, Kim Watson and ME!!  You can download the FREE cut files by visiting the Hip Kit Club website and signing up for a free account.  Subscriber cut files are only available to those that are subscribing to the monthly Kits.  So it's a great incentive to check out the Subscription info!!


Stay tuned here, the Hip Kit Blog and the Hip Kit Facebook page for more inspiration using the November 2015 Hip Kit & Add-On Kits!


https://www.etsy.com/shop/TheCutShoppe

Friday, November 6, 2015

Hip Kit Club | Perfect Pumpkins

I have another layout to share with you today, using the gorgeous October 2015 Hip Kit & Add-On Kits from Hip Kit Club!  I wanted to create a fun background element on this layout, and mix in several patterned papers from the October 2015 Main Kit.  I designed the background in Silhouette Studio, and worked on putting it together before adding my photo and other embellishments.


Once I had the background finished, I placed my photo and the embellishment cluster to the right, using some of the Simple Stories wood veneers included in the Main Kit and one of the Pink Paislee arrows from the October 2015 Embellishment Kit.  I also layered one of the Project Life cards from the October 2015 Project Life Kit, behind my photo, because the "such a good time" sentiment was perfect with my photo.


I liked that my photo had a good bit of White space at the top, and I used it to place my title.  This is a great way to keep your title from getting lost in the background, if you have a busy background pattern.  I wanted to include several embellishments from the Kits, so I placed a few more wood veneers from Simple Stories, Bits & Ephemera from Pink Paislee and Pebbles Inc., and enamel dots from Heidi Swapp around the layout.


To finish off the layout, I added a bit of machine stitching to a few of the embellishments.  I love the extra texture that stitching adds to a layout!

I also have a Process Video to go along with my layout, if you would like to check it out!


And now, it's time to be on the look out for the November 2015 Hip Kit & Add-On Kits!  If you're a subscriber, they'll be coming your way soon!  If you have subscribed yet, make sure you visit the Hip Kit Website and sign up today!

Monday, November 2, 2015

Page Maps & The Cut Shoppe Team Up!

This month The Cut Shoppe teamed up with Page Maps for the November Page Maps reveal!  I wanted to stop in and share the layout I created based on a single page sketch, along with the Pie Hearts cut file and the Borderlines cut file from The Cut Shoppe.


http://www.pagemaps.com/

https://www.etsy.com/listing/193530389/the-pie-hearts-cut-file-consists-of?ref=shop_home_active_1&ga_search_query=pie%2Bhearts

https://www.etsy.com/listing/196672172/the-borderlines-cut-file-consists-of-5?ref=shop_home_active_2&ga_search_query=borderlines

I used the new Shine collection from Maggie Holmes, and used the Dazzle patterned paper to back the Pie Heart cut files.  I stayed close to the sketch, but changed from three photos to one photo, and added a cut out from one of the Shine patterned papers.  

Make sure you visit the Page Maps website to check out the other amazing layouts created for the November Page Maps!

And we are having a sale all through this week, at The Cut Shoppe!  Just use the Discount Code PMTCS30 to save 30% off of your purchase!

https://www.etsy.com/shop/TheCutShoppe
Supplies:  Pie Hearts cut file & Borderlines cut file:  The Cut Shoppe; Patterned Paper, Thickers, Stickers & Wood Veneers:  Maggie Holmes; Color Shine:  Heidi Swapp; Die Cut Machine:  Silhouette Cameo

https://www.etsy.com/shop/TheCutShoppe