Wednesday, December 31, 2014

A Flair for Buttons | Merry Grinchmas

Christmas has come and gone, and now I've got plenty of new holiday photos to document!  And I am excited about the awesome Christmas and holiday Flair sets that are available in the A Flair for Buttons Shop!  There are so many great choices, so I decided to use Flair from three different sets on my layout!


I went with a circle design on my background, and knew the Flair buttons would be a perfect combination with the die cut circles.  I chose Flair from the Hashtag Winter Flair set, the Joy Flair set and the Holiday Words Flair set.


Before I added the die cut circles and Flair Buttons, I used a Pink Gelato and drew rough circle shapes on the White cardstock.  Then I blended the Gelato with my finger tip, to create a pop of color behind the die cut circle and Flair.


So if you're ready to get started on some of your Christmas photos from this year, make sure you stop by the A Flair for Buttons shop, to check out all of the great designs to coordinate with your layouts!  And if you are still working on your December album, the Flair buttons would be a perfect addition to add to your daily pages!

Supplies:  Patterned Paper, Wood Veneers, Letter Stickers, Tags & Acrylic Stamp:  Elle's Studio, Flair Buttons:  A Flair for Buttons; Doo-Dads Cut File:  The Cut Shoppe; Gelatos:  Faber-Castell; Color Shine:  Heidi Swapp; Die Cut Machine:  Silhouette Cameo 

https://www.etsy.com/shop/TheCutShoppe?ref=ss_profile

Tuesday, December 30, 2014

American Crafts | Serendipity Desk Organizer

This week on the American Crafts Blog, the Design Team is sharing projects using the new Serendipity collection from Dear Lizzy!  And I don't know about you, but I love to look at all of my new products.  Sometimes they are just as pretty as the finished project!!  I love to have my new products out on my desk, so they are visible and ready to use.  So I decided to put the Serendipity collection to good use and create a Desk Organizer from a few empty boxes found in the pantry.


This was a fun project to put together, and it's perfect for holding some of your favorite products!  Who doesn't love cute and functional storage??!!  If you would like to recreate the Desk Organizer make sure you stop by the American Crafts Blog, to check out my tutorial for putting this project together!

Supplies:  Serendipity (369186) - Summer Breeze, Serendipity (369196) - Liz Lemon, Serendipity (369191) - Good Vibes, Serendipity (369203) - I Heart You, Serendipity (369189) - Lucky Love, Serendipity (369218) - Die Cut Cardstock Shapes, Serendipity (369226) - Premium Ribbon, Serendipity (369217) - Pleather Bows, Serendipity (369215) - Enamel Dots

https://www.etsy.com/shop/TheCutShoppe?ref=ss_profile

Monday, December 29, 2014

American Crafts | 2015

The American Crafts Blog got an early start by celebrating the New Year, last week!  The Design Team shared their New Year's project, and I was up with a New Year's Card last Thursday.  I wanted to pop in today and share it with you!


How to: Type in the numbers 2015 in your die cut machine software and weld them together. Copy the welded numbers, flip them vertically, and weld the two sets together. Once your card shape is cut, fold it in half. Sprinkle with Gold Color Shine. Cut a banner piece from the Stitched 6x6 Paper Pad and place it in between the top and bottom numbers. Use the Shimelle Fitzgerald Thickers to create a New Year sentiment by lining the letters up on the banner. Die cut stars using the Stitched Dies set and adhere them to your card. Finish your card by adding the Celebrate sticker from the Shimelle Accent & Phrase Stickers pack.

Supplies: Cardstock (71259) - White, Stitched (368965) - 6x6 Paper Pad, Stitched (368985) - Dies, Shimelle (368162) - Fitzgerald Thickers, Shimelle (368166) - Accent & Phrase Stickers

https://www.etsy.com/shop/TheCutShoppe?ref=ss_profile

Wednesday, December 24, 2014

Hip Kit Club | Two Scoops

Merry Christmas Eve!  I'm stopping in today for a quick post to share a new layout and card for Hip Kit Club, using the December 2014 Hip Kit & Add-On Kits.


I love that the monthly Hip Kits include two sheets of Vellum in the Cardstock Add-On Kit. I wanted to use one of the full sheets this week, to tone down my background paper. I used the Black & White striped patterned paper from Heidi Swapp's Serendipity collection and layered the Vellum over the top. Before machine stitching the Vellum over my background paper, I added a couple of the Amy Tan Bits, in the background, so they would be covered once I attached the Vellum. Then I layered my photo and other elements over the Vellum layer. And I just had to use the Amy Tan Embroidery Stencil Kit again, to create the title of my layout. I kept the color scheme mostly Black & White on my layout, and added in touches of Red and Teal.


The Afternoon Breeze patterned paper from Heidi Swapp, included in the Hip Kit Main Kit, is perfect for creating quick sentiments on your cards. I started with the Kraft cardstock from the Cardstock Add-On Kit for the base of my card, and then covered it with patterned paper from the Amy Tan Stitched collection. I added the Go. Seek.Explore card, cut from the Afternoon Breeze paper as the sentiment for my card. And I wanted to keep the embellishments simple, so I added the enamel dot and star from the Stitched collection and an arrow from the Evalicious puffy stickers.

https://www.etsy.com/shop/TheCutShoppe?ref=ss_profile

Monday, December 22, 2014

American Crafts | Christmas Cards

Merry Christmas week!! I can't believe it's almost time!  I still have a few things to take care of, but thankfully all of the BIG Christmas shopping happened on Black Friday!  Today though, I wanted to pop in and share two cards I created for Christmas Cards week, that were shared on the American Crafts Blog last week.  Hopefully you've gotten your Christmas cards in the mail if you're sending them out this year, but if not here's a little inspiration to store away for next year!


Supplies: Be Merry (368911) - Checking It Twice, Be Merry (368932) - Sticker Roll, Be Merry (368927) -Decorative Tags, Be Merry (368930) - Photo Overlays, Be Merry (368931) - Die Cut Cardstock Shapes, Be Merry (368929) - Wood Veneer
 
How to: Cut white cardstock at 4.5x11" and fold in half. Randomly adhere several snowflake pieces from the Be Merry Bits pack to the front of your card. Stitch one of the Be Merry photo overlays onto the front of your card using white thread. Add the small snowflake tag over the photo overlay and place a wood veneer snowflake in the center of the tag. Use the Merry Christmas banner piece from the Be Merry Bits pack as the sentiment for your card and stitch it on with white thread. Finish by adding a tag sticker peeking out at the top of your card.


Supplies: Be Merry (368917) - Let It Snow, Be Merry (368911) - Checking It Twice, Be Merry (368931) - Die Cut Cardstock Shapes, Be Merry (368929) - Wood Veneer, Be Merry (368926) - Accent & Phrase Stickers, American Crafts Zing Embossing Powder
 
How to: Cut white cardstock at 4.25x11" and fold in half. Cut a piece from the Let It Snow patterned paper and tear along the top edge. Adhere to front of card. Add some adhesive above the torn paper edge and then sprinkle with American Crafts Zing Silver Glitter. Add the Santa's List piece from the Be Merry Bits pack and add names using the small alpha stickers from the Accents & Phrase stickers pack. Finish by adding wood veneer Snowflakes.

 I hope you have a great week, and a Merry and safe Christmas holiday!!

https://www.etsy.com/shop/TheCutShoppe?ref=ss_profile

Friday, December 19, 2014

Echo Park | Christmas Packaging

Well, we can officially say there is less than a week until Christmas!  And do I have any gifts wrapped?  Nope, not a one!!  But I do have two cute Christmas Packaging ideas to share with you today, using a mix of the Christmas Cheer and Home For the Holidays collections from Echo Park.


I used my Silhouette Cameo to cut the Pillow Box and Gift Bag, using patterned papers from the Christmas Cheer collection.  Then it was easy peasy to decorate the outside of my wrapping, using Decorative Brads and the sticker sheets from the Christmas Cheer collection.

My family always gets together on Christmas Eve, to exchange presents and eat lots of yummy food!  These gift wrap ideas would work perfectly for packaging Gift Cards and small items for my family members.

And these fun packages could also be adapted for other holidays or events!  You could change your papers and embellishments to create packaging for teacher gifts, birthday gifts, and they would be perfect for Valentine’s Day gifts…which will be here before you know it!

Supplies:
Cozy Quilt Patterned PaperHoliday Plaid Patterned PaperSnow Globes Patterned PaperChristmas Cheer Decorative BradsChristmas Cheer Flair Buttons
Home for the Holidays Decorative BradsTwine
Wood Veneer Star
Silhouette Cameo


https://www.etsy.com/shop/TheCutShoppe?ref=ss_profile

Thursday, December 18, 2014

Hip Kit Club | Brown Eyed Girl

Things have been a kind of hectic this week, so I am stopping in with just a quick post sharing a new layout and card for Hip Kit Club, using the December 2014 Hip Kit & Add-On Kits.


There are some beautiful colors in the December 2014 Hip Kit & Add-On Kits! And I love the touches of Gold that are included! I wanted to create a soft look on this layout, so I cut several of the strips from the Thrifted patterned paper, and then arranged them on a
White cardstock background. After each of the strips were in place, I added machine stitching. Then I placed my photo and most of the embellishments in a vertical design on the page. I wanted to create a large title so I mixed the Dear Lizzy Printed Foil Letter Stickers and the Woodland Thickers. And I used the Evalicious wood veneers and puffy stickers to finish my layout, and add a bit more texture to the page.


It's all about tags on my card, today! How fun are the tiny tags included in the December 2014 Hip Kit & Add-On Kits, from Jillibean Soup!! I love the simple craft color, and decided to use three of them across the front of my card. I chose two of the tags with the heart cut out and a plain tag, to place my sentiment over. This card was super easy to put together, and I added some of the Evalicious puffy stickers to get a little more dimension on my card!

Make sure you visit the Hip Kit Club Shop, because the January 2014 Hip Kit & Add-On Kits has been revealed, and it's going to be another awesome month!  Here's a look at what's included in the Main Kit:

http://www.hipkitclub.net/january-2015

Thanks for stopping by today!

https://www.etsy.com/shop/TheCutShoppe?ref=ss_profile

Monday, December 15, 2014

A Flair for Buttons | Christmas Past

Happy Monday, everyone!  It's happy because it's our last week of home school, before we take off for our Christmas holidays!  Hopefully I can survive and find things to keep the kids occupied for two whole weeks!  I am stopping in today, to share a new layout with you for A Flair for Buttons.

I'm sure that all of us have special ornaments from our past, that we hold near and dear.  I recently aquired the Vintage ceramic Christmas tree, that was one of my favorite decorations displayed in my grandparents house each year.  I am so happy to have received it, through a strange string of events.  It is now displayed in our home, and I wanted to document it on my layout today.  I thought it would be fun to use a modern twist with my Vintage Christmas decor, and use the Hashtag Winter Flair, as well as the Holiday Words Flair.


I thought it would be fun to put the #Merry and #Christmas Flair Buttons together on the American Crafts tag.  And the Deck the Halls Flair was perfect for the theme of my photo.  I also used the Make It Merry cut file from The Cut Shoppe, to add some layering behind my photo, tags and embellishments.

You can check out both of these awesome holiday Flair sets in the A Flair for Buttons Etsy store, along with lots of other great Flair!


https://www.etsy.com/listing/162211447/hashage-winter-flair?ref=shop_home_active_22


https://www.etsy.com/listing/212279065/holiday-words?ref=shop_home_active_20

Supplies:  Flair Buttons:  A Flair for Buttons; Patterned Paper, Tags, Letter Stickers & Wood Veneers:  Elle's Studio; Patterned Paper, Thickers & Tags:  American Crafts; Make It Merry Cut File:  The Cut Shoppe; Color Shine:  Heidi Swapp; Die Cut Machine:  Silhouette Cameo

https://www.etsy.com/shop/TheCutShoppe?ref=ss_profile

Thursday, December 11, 2014

Hip Kit Club | So Lucky

I always get a little giddy, when my kits arrive each month from Hip Kit Club!  I have to open them up right away, and look at all of the goodies.  And I have to say, that the December 2014 Hip Kit & Add-On Kits, is pretty stinkin' awesome!  I love all of the new products from the Amy Tan Stitched collection, and there are some fab wood veneers from Evalicious!  So I'm stopping in today, to share my first layout and card, using this month's Kit!


I love to hand-stitch on my layouts, so I was super excited to see the Amy Tan Comrade Embroidery Stencil, in the December 2014 Embellishment Kit. I wanted to use it, for the title on my layout, to add a fun texture to my page. It's such a great alpha, and it gives you the option to add color with different threads. I used the Teal and Black thread included with the Stencil, to fit in with the color scheme of my layout. And I wanted to use the Washi Tape from the Embellishment Kit, to create some star embellishments for my page. I layered 4 strips of the Washi Tape over the Vellum from the December 2014 Cardstock Add-On Kit, and then punched out the star shapes. I added a touch of adhesive behind each star, and then attached them with machine stitching.


I wanted to create a card featuring the Thickers and Amy Tan rub-ons from the December 2014 Hip Kit Main Kit. I used the Applique patterned paper for my card base, which provided me with lines to follow, to line up the Thickers for my sentiment. And I love that the Amy Tan rub-ons let you add a watercolor look to your projects. I layered one of the heart shapes from the Amy Tan Bits pack, over the rub-on, and finished my card by adding some drops of spray mist.

Make sure you stop by the Hip Kit Shop to pick up a December Kit, before they are sold out!!

https://www.etsy.com/shop/TheCutShoppe?ref=ss_profile

Tuesday, December 9, 2014

Echo Park | Life Is Delicious

Today, I'm stopping in to share a card using the fun Made From Scratch collection from Echo Park!  If you love to cook, then this collection is perfect for creating layouts about your love of cooking.  But it’s not just for layouts!  You can also use the collection to make fun, creative cards for your friends and family. I thought it would be fun to use the Apple Die Set, to create a dimensional look on my card.


I created a quick tutorial showing how I created the dimensional look on my card with the Apple Die Set from Echo Park.  If you would like to check it out, you can find it on the Echo Park Blog, HERE.

Supplies:
Made From Scratch 6x6 Paper PadDesigner Die Apple Die Set
Made From Scratch Alpha StickersMade From Scratch Element Stickers


https://www.etsy.com/shop/TheCutShoppe?ref=ss_profile

Thursday, December 4, 2014

Hip Kit Club | Under the Tree

I can't believe I'm already sharing my last two projects with the November 2014 Hip Kit & Add-On Kits!  But, that means that my new December 2014 Hip Kit & Add-On Kits is on the way from Hip Kit Club!!  I had so much fun using the November Kit and I can't wait to start creating with the December Kit!  I wanted to stop in today and share the layout and card that I created with the November Kit.


It's always fun to think outside the box, when you are cutting your patterned papers. I decided to cut several chevron pieces from the papers in the November 2014 Hip Kit & Add-On Kits, using my paper trimmer. After laying them out on the White cardstock background, I decided to turn them into a Christmas tree! The design went right along with my photo and title. After I adhered each of the chevron pieces, I machine stitched each one and added some stars, for tree decorations. And I wanted to add a pop to the Studio Calico wood veneer numbers, that I used for the date on my layout, so I painted them with the Sweet Cherry Color Shine, that came in one of the previous Hip Kits! I finished my layout, by adding several of the tags from the Elle's Studio Good Cheer collection.


Pink and Red is one of my favorite Christmas color combos, so I decided to use some of these colors from the products in the November 2014 Hip Kit & Add-On Kits for my card. I started with the Red cardstock from the Cardstock Add-On Kit for my base. Then I layered several elements from the Elle's Studio Good Cheer collection to the front of my card. And to finish my sentiment, I used the Silver Buckaroo Thickers and overlapped some of them, to create a fun dimensional look on my card!

Be on the look out for new projects using the December 2014 Hip Kit & Add-On Kits!  I'll be sharing my first layout and card next week!!

https://www.etsy.com/shop/TheCutShoppe?ref=ss_profile
 

Wednesday, December 3, 2014

American Crafts | Silhouette Love Frame

This week it's Silhouette week on the American Crafts Blog!  I love using my Cameo, and using it with my American Crafts products, makes it even more fun!  I created a framed home decor piece using the Love cut file from American Crafts, in the Silhouette Store.


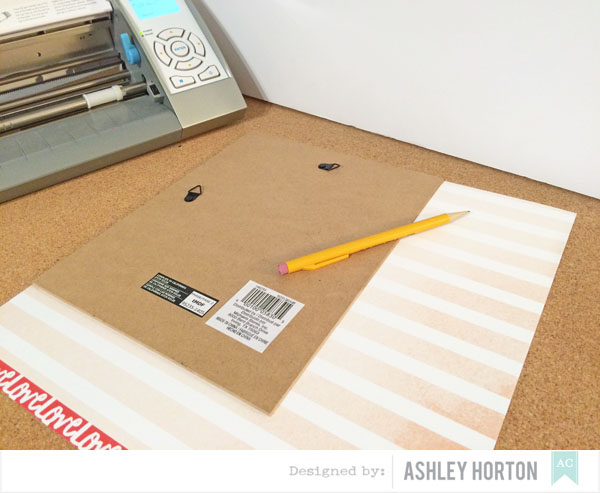
And I also have a tutorial to share with you, showing how I put the frame together!

1. Remove the glass and backing from an 8x10 white frame.


2. Mark the 8x10 guidelines on your patterned paper - that will serve as the main cut out for the inside of your frame. You can make sure your marks match up on your Silhouette cutting mat.


3. In Silhouette Studio, repeat the Love phrase over and over in your 8x10 cutting space. The "Love" die cut can be found in the American Crafts artists folder in the Silhouette Store.


4. After all of your Love words are in place and lined up, delete the alternating words. This will give you a negative and positive effect once your frame is completed. Cut away!


5. When the machine has finished cutting, remove your paper and trim it to the 8x10 size on your paper trimmer.


6. Now you will want to cover the backside of your Love cut paper. Make sure the pattern you want to see is facing forward when you adhere it to the back of your paper.


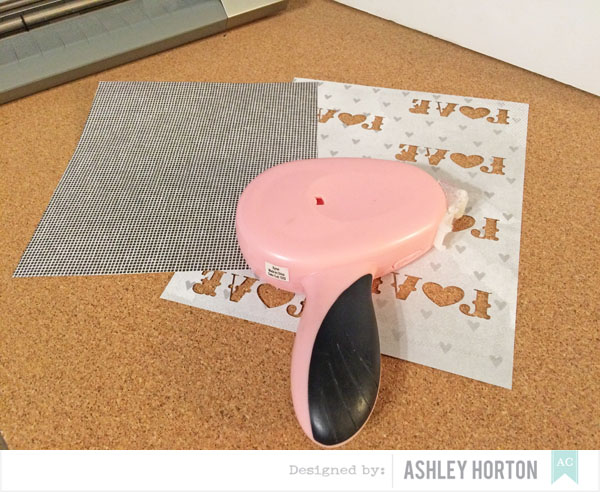
7. Now, you can go back into Silhouette Studio and cut the word "Love" from two different patterned papers. I cut 4 words on each pattern from the 6x6 Paper Pad. Then add the words to your 8x10 background piece by alternating each of the patterns.


8. Once all of your words are in place, use a strong adhesive around the backing of the frame and adhere your 8x10 paper to it.


9. Now you can close the tabs on the back of the frame and embellish your frame with stickers, Garland, and patterned paper from the Stitched collection!


And the great thing about this frame is that it could be adapted for boy decor, a baby's room, or how about even for your own room - the possibilities are endless!

Supplies: Stitched (368954) - Applique, Stitched (368958) - Felted, Stitched (368962) - Dobby, Stitched (368965) - 6x6 Paper Pad, Stitched (368979) - Garland, Stitched - Accent & Phrase Stickers, Stitched (368978) - Enamel Dots, Stitched (368972) - Matte Puffy Accents, Love Cut File