Thursday, July 31, 2014

Hip Kit Club | Say Hello...

The months fly by when you are creating with the awesome kits from Hip Kit Club!  I'm already at the end of the July Hip Kit & Add-On Kits!  But the good thing about the end, is that you know another awesome kit will be coming for the next month!  Here's my last layout and card, created with the July Kits!


I love to create big, bold titles on my layouts as a part of the page design! So the alpha options in the July 2014 Hip Kit & Add-On Kits are right up my alley. Did you know, that you have FIVE alpha options in this month's Kit??!! The October Afternoon alphas include two styles, you also have Printshop and Typewriter Thickers from American Crafts, and an alpha and labels sticker sheet from Teresa Collins! I mixed letters from each of the alpha sets in with some of the October Afternoon Daily Flash embellishments to create a fun, graphic title on my layout!


Today I did something a little different with my card, by creating a shaped card! I found a cute banner design in the Silhouette store, and cut it on my cameo. The card was already sized to 4.25x11, so all I needed to do, was fold it, once it was cut. I added some layers using one of the Crate Paper Open Road frames and some of the chipboard embellishments from the Teresa Collins chipboard pack. And I love the little chipboard banner pieces...they fit right in, with my banner shaped card!

You can check out the new August 2014 Hip Kit & Add-On Kits, in the Shop and get your order in!!  The Kit contains some of the new Shimelle from American Crafts and the Brighton Pier collection from Studio Calico!  

Wednesday, July 30, 2014

American Crafts | Altered Initials

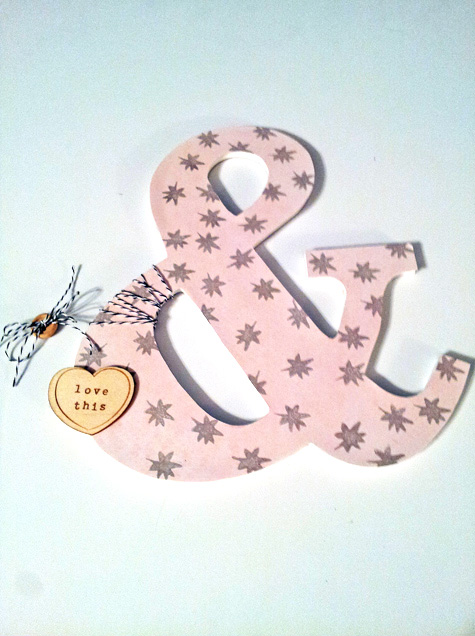
This week the American Crafts Blog is featuring Mix & Match, using your AC collections.  I created an Altered Initials tutorial, using a mix of the Plus One collection from Amy Tangerine, the Daydreamer collection from Dear Lizzy and the DIY Shop collection.

 
To create this project, you will need wooden letters, Mod Podge, foam brush, hot glue gun, Plus One collection, Daydreamer collection, and DIY Shop collection. Begin by tracing each of your letters and ampersand onto the backside of the patterned paper you want to use.


The ampersand I bought was brown, and I wanted the edges to be white, like the initials, so I used acrylic paint to paint the edges.

 
While the paint on the ampersand dried, I cut out the traced letters and covered the wooden letters with Mod Podge. After you place your traced letter over the wooden letter, make sure you smooth it out to keep bubbles from forming under the paper.


I wanted to add some stamping to my project so I used the fun asterisk stamp from the Plus One acrylic stamps and randomly stamped a pattern on the traced ampersand. Then I adhered the traced shape with Mod Podge and gathered some embellishments to add to it.


The fun part is embellishing each of your letters. I wanted to use the wood veneer butterflies from the DIY Shop collection on the M initial. I placed each of the butterflies where I wanted them on the letter and then stamped over several of them with the chevron stamp from the Plus One acrylic stamps. Then I added the burlap bows and enamel dots to some of the butterflies.


I love that you can create a cohesive project mixing the AC collections!  And it's always fun to mix collections on your layouts and cards too, and get so many different looks!

Supplies: Friend (366825) - Plus One, Accompany (366956) - Acrylic Stamps, Mixtape (366839) - Washi Tape, Whittles (366907) - Screenprinted Clothespins, Cat's Cradle (366762) - Daydreamer, Veneer Set (366781) - Daydreamer, Enamel Dots (366785) - Daydreamer, Accent & Phrase Stickers (366778) - Daydreamer, Wood Buttons (366611) - DIY Shop, Light Burlap Bows (366626) - DIY Shop, Wood Veneer Butterflies (366618) - DIY Shop, Wooden Letters, Mod Podge, Twine, Ink

https://www.etsy.com/shop/TheCutShoppe?ref=ss_profile
 

Tuesday, July 29, 2014

A Flair for Buttons | Hello Happy

It's time to share a new layout for A Flair for Buttons!  This layout combines two of my favorite things...cut files and Flair Buttons!  I had a cute photo of the girls at the swimming pool, so I wanted to create a fun, girly layout to match the picture.  I decided to use a large talk bubble cut file in the background, and then I chose three different Flair Buttons to add to several of the talk bubbles.


I used Flair Buttons from the Krafty 2 set, the Take a Picture 3 set and the Best Friends set.  The color on each of the Flair Buttons paired perfectly with the Echo Park collection I used for my layout.  The Hello, Let's Chat Talk Bubble cut file is from my Etsy store, The Cut Shoppe.  There are a lot of fun options for mixing your Flair Buttons with different cut files!  You can combine them to create fun and unique looks on your layouts!

You can visit the A Flair for Buttons shop, to pick up the sets that I used on my layout or any others that might catch your eye!!  Thanks for stopping by today!

Supplies:  Patterned Paper:  Echo Park; Flair Buttons:  A Flair for Buttons; Hello, Let's Chat Cut File:  The Cut Shoppe; Wood Veneers:  Elle's Studio; Neon Brad Stickers:  Pinkfresh Studio; Thickers:  American Crafts; Polaroid Frame:  Crate Paper; Stickers & Enamel Dots:  Teresa Collins; Die Cut Machine:  Silhouette Cameo

https://www.etsy.com/shop/TheCutShoppe?ref=ss_profile

Sunday, July 27, 2014

Creative Scrappers Sketch 274 | You Are Here

We've had some awesome sketches at Creative Scrappers and the reveal for today's Sketch is no exception!  This one was a little different for me, with the two separate photo spaces, because I usually cluster my photos together, but I was really happy with the end result of the layout!


If you're wondering, Yes that is the October Afternoon Travel Girl collection.  I have been holding on to every little scrap...one of my favorite collections ever!  My layout is really close to the Sketch.  I loved everything about it.  I used the Going in Circles cut file from The Cut Shoppe, and backed most of them with different patterned papers.  I cut the circles on Adhesive Backed Cardstock from Silhouette, which makes it really easy to add the patterned paper behind your cut out shape!  I also used the You Are Here title from the Travelin' On cut file set from The Cut Shoppe.

If you love the new Sketch, it's your turn to create a layout!  We would love for you to link up your layout on the Creative Scrappers Blog, for the chance to win from our Sponsor, Pinkfresh Studio...I even used some Pinkfresh goodies on my layout!  You won't want to miss out on the chance to win or have your layout featured for our Wednesday Layout Feature!

http://pinkfreshstudio.blogspot.com/
Supplies:  Patterned Paper, Stickers, Tidbits, Flair Buttons, Stamp:  October Afternoon, Neon Brad Stickers & Wood Veneers:  Pinkfresh Studio; Going in Circles & Travelin' On cut files:  The Cut Shoppe; Die Cut Machine: Silhouette Cameo; Enamel Dots:  Recollections; Tiny Attacher:  Tim Holtz

https://www.etsy.com/shop/TheCutShoppe?ref=ss_profile

Thursday, July 24, 2014

Hip Kit Club | Big Wheels Keep On Turnin'

I am in embellishment heaven, with the July Kits from Hip Kit Club!  Did you know you get the entire ephemera pack from Crate Paper's Open Road collection??!!  So awesome!  We don't travel a whole lot or too far...it's kind of expensive for a family of 5 and usually big time stressful with our 3 crazy kids...but we do get away for a little weekend or day trip every now and then.  I had so cute photos of our son from a trip to Birmingham back in April and knew the Open Road ephemera pack would be great to use on this layout!


I love the mix of travel embellishments in the July 2014 Hip Kit & Add-On Kits, mixed with the neutral papers. It was the perfect mix for scrapping these photos of our son from a weekend trip, back in April. I loved that he was just hanging out in front of a train engine, at one of the locations we visited...just being a typical boy. I added several pieces from the Crate Paper Open Road ephemera pack and some of the great travel wood veneers from the Chic Tags Let's Go collection.


I really love the camera themed items included in the July 2014 Hip Kit & Add-On Kits. The October Afternoon Daily Flash collection has some great chipboard camera pieces and fun patterned papers. I chose one of the chipboard cameras and paired it with one of the Crate Paper Open Road frames for my card. There's also great colors in this kit, that give a vintage vibe, and I love the mix of the Yellow, Orange, Light Blue and touch of Black!

It's hard to believe, that it's almost time to start working with the August 2014 Hip Kit & Add-On Kits!!  It's going to be an amazing Kit, and it includes some of the new Shimelle collection from American Crafts and Brighton Pier from Studio Calico!  Here's a look at what's included:

 August 2014 Main Kit

 AUGUST 2014 COLOR ADD-ON KIT

 AUGUST 2014 EMBELLISHMENT ADD-ON KIT

You can visit the Hip Kit Blog, for a specific product list of what is included in each of the Kits and for pricing.  To purchase the August 2014 Hip Kit & Add-On Kits, make sure you stop by the Shop!
https://www.etsy.com/shop/TheCutShoppe?ref=ss_profile

Tuesday, July 22, 2014

American Crafts July Gallery | Go See Do

It's time to share a new layout for the American Crafts July Gallery!  I have the hardest time throwing away the tiniest scraps of my AC patterned papers!  They are just too awesome to get rid of!  So I like to find ways to use those small scraps on my layouts...like backing a die cut title with the different patterns!


Sadly, I do not have anymore full 12x12 sheets of patterned papers in my Plus One collection!  HA!  They have all been cut into, one way or another.  I decided to use Black cardstock for my background, because I thought it would add a great graphic feel to my layout and pair really well with the small amounts of color from the Plus One papers I used. I added some die cuts to my layout, from The Cut Shoppe.  Since my page had a travel theme, I used the US shape from the On the Road cut file and Go. See. Do. as my title, from the Let's Talk Summer cut file.  And the Mixtape Washi Tape from the Plus One collection, was perfect for adding some traveling lines to my US map cut file!

Thanks for stopping in today!  Make sure you check out the American Crafts Blog this week, to see what the designers are sharing for Signature Style week!

Supplies:   Sidekick (66813) - Plus One; Partner (66814) - Plus One; Ensemble (66827) - Plus One; Friend (66825) - Plus One; Co-Pilot (66810) - Plus One; Mixtape (366839) - Washi Tape; Us (366842) - Remarks; Bits (366849) - Die Cut Cardstock Shapes; Team (366838) - Sticker Roll

Monday, July 21, 2014

Pinkfresh Studio and Neat & Tangled Blog Hop!

Pinkfresh Studio is so excited to join with Neat & Tangled today to inspire you with some cute creations. Neat & Tangled has a great selection of stamps, that mix so well with the fab products from Pinkfresh Studio!  Design Team members from both teams are sharing their projects with you today, along the Hop!  Make sure you visit each Blog, including the Pinkfresh Studio Blog, and comment to be entered in our giveaway. One winner will be chosen for each day, and they will receive $20.00 worth of products from both companies. This is going to be 2 days of Blog hopping fun. Winners will be announced on July 27th!


You should have arrived here from Kristen Foreman's Blog.  If you didn't, make sure you start out at the Pinkfresh Studio Blog, to get started at the beginning of the Hop.

I used a mix of Pinkfresh Studio products and Neat & Tangled products to create a layout and card.


I love talk bubbles, so I just had to use the A Lot to Say talk bubble stamp from Neat & Tangled, along with some of the new stamp sets from Pinkfresh Studio.  Everything coordinates so well together!


Triangles are a really popular pattern in the crafting world, and I love using them on my projects.  I created my own background paper for my card, using the Tiny Triangles stamp from Neat & Tangled, and finished my card by adding the Smile stamp from Pinkfresh Studio, along with a few of the Color Block Wood Veneer Triangles and one of the Studio Puff borders!

I hope you enjoyed visiting my Blog and found some inspiration for your upcoming projects!  Now you are off to visit Joni Andaya's Blog.  Here is a complete list of the Hop order, in case you lose track along the way:


https://www.etsy.com/shop/TheCutShoppe?ref=ss_profile

Thursday, July 17, 2014

Hip Kit Club | Picture Perfect

My post for Hip Kit Club today, is all about working fast!  I can't believe that it used to take me about 3 hours...or more...to complete a layout back in the day.  Now, my average time is around 1.5 hours.  And sometimes I can pull one out in around an hour.  But when you have an amazing kit, like the July 2014 Hip Kit & Add-On Kits, it's really easy to put a layout together in less than an hour!


If you're short on time, with all of the busy days of Summer, but still want to squeeze in some crafting time, here are some tips for creating a layout in under an hour! I put my layout together in 45 minutes, using the July 2014 Hip Kit & Add-On Kits. I started by choosing a large photo, 4x6. Typically my photos are no bigger than 3.5, which leaves a lot of space for embellishing, but when you use a larger photo, you don't have to fill in as much of your page. Then I chose the fun Snapshots patterned paper from the October Afternoon Daily Flash collection and cut out several of the squares. This provided me with a great grid design on my layout. Instead of spending time, cutting a title on my Cameo, I used the American Crafts Thickers with the October Afternoon letter stickers to create my title. And then it comes down to choosing just the perfect embellishments for finishing your page!


As I was looking through the Teresa Collins products that are included in the July 2014 Hip Kit & Add-On Kits, I noticed that the phrase "Something Wonderful" was repeated several times. It gave me the idea to use it as the sentiment on my card and repeat the phrase. I added some of the Chipboard pieces along with the stickers, and used the fun Triangle patterned paper, as the base of my card. I tied on some twine from my stash, for extra texture and used a few of the Teresa Collins buttons for dimension.

It's always fun to share quick and easy ideas for putting projects together!  Busy crafters are always looking for ways to get more bang out of their time in the craft room, so I hope today's post gave you some ideas for speeding up your projects!

https://www.etsy.com/shop/TheCutShoppe?ref=ss_profile