
Wednesday, February 29, 2012
A Great Giveaway
My friend Tina is having an amazing giveaway on her Blog!! She has cleaned out her scrap room and let me just tell you, it is a haul of awesome goodies!! If you would like to be entered for the chance to win, head over and check out her post HERE. Now I will have to say, if one of you win, I expect some share the love with all of those goodies, since I sent you over!! HA! :) JK! Good luck everyone...but I am crossing my fingers that she picks my name for this one!! :)
Saturday, February 25, 2012
Mmmmmm....MME!
Has there ever been one of THOSE lines that come out, that you just have to have, like yesterday? Well, for me the new MME lines that came out at Winter CHA were a MUST-HAVE! I have been drooling over them for months now! So, when they finally came in at my LSS...well, let's just say I was about to burst with excitement! Now on to the damage...I purchased $70 worth of the new lines!! YIKES! I know that sounds bad, but I do get a 20% discount for being on the DT, which brought it down to $55. Then I fortunately had $25 in store credit for some items I had sold in consignment, so luckily, I made it out with only paying $30 out of pocket for a bag full of amazing goodies!
So far, I have created two pages with these lovely products. The first, I can't show until later in March, because it is one of my DT pages for Sketch Support. But I can share the one I created yesterday for Case File #7 at CSI. It's a mix of On the Bright Side and some of the Mrs. Caroline.


I kept looking at this color scheme all week, thinking how in the world am I going to use this? But once I decided to use the red as the dominant color, everything else feel into place. I incorporated smaller amounts of the pink and purple, by using purple baker's twine and pink in the honeycomb shapes and for the butterfly. The evidence and testimony worked perfectly with the theme of my photo and layout. I chose distressing, wood or woodgrain, and stripes for my evidence and for the testimony, I used the inspiration word "root" for my journaling.
So now that I have solved Case File #7, I am REALLY looking forward to "cracking" Case File #8, which was posted last night! It has an AWESOME color scheme and I must say that I am happily delighted...because there is no Purple in this week's color scheme!! :)
Products Used:
Patterned Paper, Brads, Journal Card, Wood Die-Cut: My Mind's Eye
Baker's Twine: The Twinery
Ink: Memento
Mini Market Stickers: October Afternoon
Thickers: American Crafts
Pen: Zig Memory System
Friday, February 24, 2012
I Did It!
I set out this week, to complete all of the daily challenges going on at Bella Blvd. And now I am happy to say I accomplished my goal. Although, today started out a little bit "iffy", because we were up with our youngest last night until around 3:30AM. Seems to be that he contracted a tummy virus from someone at church yesterday...those are the times that I can say, it's definitely not okay to share!! :) He is still not feeling great today...cranky, tired, doesn't want to eat, and still running a little fever, but hopefully it is only a 24 hour virus.
Now, back to my layout!! Today's challenge, was to use punched circles. I love using my circle punches on my layouts, and I actually used it on my layout for yesterday's challenge, before I even knew what today's was!! :) So for this page, I used my 1 inch punch to create the chevron, scalloped border across my page and for the large flower. I punched a total of thirteen, 1 inch circles and layered them around the base of a 2 inch circle. Then I used my 1/4 inch punch for the smaller circles in the center of the flower.


I always think it's fun when you can take a paper line and use it out of context, which is what I did for this layout. I used Bella's Spring Flings and Easter Things, which obviously from the name, you can gather that the line focuses on Spring and Easter. But I thought the papers coordinated well with these funny photos of our daughters trying on all of the Mardi Gras hats in Party City, so I decided to pair the line with these photos. Mardi Gras colors are Green, Yellow, and Purple and each of these colors are represented on the page, but it doesn't come off as a "Mardi Gras" layout, which is what I was going for on this one.
Well, wish me luck! For those who completed all 5 challenges for the week, their name will be entered in the drawing to win $100 in Bella Blvd. goodies. I am hoping my 10 chances give me a good shot at winning!! :) I definitely need some more Bella stuff, after depleting my stash this week for all of the challenges! :)
Products Used:
Cardstock: Bazzill
Patterned Paper & Stickers: Bella Blvd.
Thickers: American Crafts
Tag: EK Success
Baker's Twine: The Twinery
Brads: The Paper Studio & Chloe's Closet
Buttons: Michael's
Punches: Marvy, EK Success, & Martha Stewart
Acrylic Paint: Apple Barrel
Acrylic Stamp: Close to My Heart
Pen: Zig Memory System
Thursday, February 23, 2012
Fall Back
Well yesterday, I shared a Christmas and Easter layout, so why not Fall today??!! This is my fourth layout this week for the Challenges at Bella Blvd. Today's challenge, was to use the border strip papers from the Bella collections. I love the fun border papers included with each line of the Bella collections and use them a lot on my pages. Since I did a Fall layout today, my choice of papers came from the Finally Fall line (which is one of my FAVORITE lines of all time so far!!). I cut some of the border strips and used them for the long banner on the left-hand side of my page and I cut three others to frame in at the top and bottom of my page.


Since my page was about our favorite activity, the Hay Ride, at our church's annual Fall Festival, I decided to use some twine I have had forever and make my own hay bale embellies for the page. I just cut out two varying size circles and used my glue gun to spin the twine around the circle. I thought about using my Glubers, but since the twine is so coarse, I thought hot glue would probably be my best course of action. I've loved using my white Gelly Roll Sakura pen lately and I used it to add in some of the letters in my title and, for my journaling, and to add a little faux stitching to the punched circles.
I have to say I am a BIG fan of having coordinated collections to get a page done quickly. This page is as "extravagant" as most of my other layouts, but it took about half of the time, since I already had everything put together in the Finally Fall line. I didn't have to spend half of my time searching for coordinating papers and embellies. But it can also be fun doing that search through all of your stash trying to find just the right papers to put together...just not when I'm in a hurry! :)
Products Used:
Patterned Paper, Cute Cuts, Chipboard Alphas: Bella Blvd.
Mini Market Stickers: October Afternoon
Brads: The Paper Studio
Buttons: Michael's
Pen: Sakura
Font: CK Journaling
Ink: Memento
Embroidery Floss: Janlynn
Embossing: Sizzix & The Paper Studio
Edgers: Provo Craft
Punch: Marvy
Other: Twine
Wednesday, February 22, 2012
Taking on the Challenge!
I have two layouts to share in today's post and don't think I have holiday schizophrenia, because I have a Christmas layout and an Easter layout!! :) I am still participating in the Challenge Week at Bella Blvd. The first layout is for Monday's challenge and the second is for today's challenge. I actually finished the one posted yesterday on that actual day and you can see it here.
Okay, so here goes. The Challenge on Monday, was to use Bella's Cute Cuts on your layouts. Each Bella Blvd. line has a 12x12 sheet that has cut outs that coordinate with that specific line. These are fun to cut and add some embellies to, to make them your own. I have the Christmas Wishes line and since I still have Christmas photos to scrap, I broke out my collection.


I cut the Christmas tree and presents from the Cute Cuts page and I added some baker's twine to each of the gifts. I stitched some garland on the Christmas tree with embroidery floss and punched out 3 circles from one of the border strip pages. I added a pop dot under each one and used my Sakura pen to draw the little star decoration on each one. I also added a dotted outline to the chipboard letters in the word Christmas with the white Sakura pen.
Products Used:
Patterned Paper, Stickers, Cute Cuts, Chipboard Alpahs: Bella Blvd.
Brads: The Paper Studio
Buttons: Michael's
Baker's Twine: The Twinery
Embroidery Floss: Janlynn
Pen: Sakura
Edgers: Provo Craft
Punch: Marvy
This second layout is for today's challenge, which is using patterned paper as an embellishment. This is a GREAT way to stretch your scrapbooking budget!! All scrappers have paper, and there are tons of great patterns out there that you can fussy cut or make flowers, banners, stars...whatever!! The possibilities are endless. I used the Spring Flings and Easter Things for this page and there are SO MANY cute ways to make embellies out of these papers!! There were already some adorable Easter Eggs on the Cute Cuts page, so I used two of those. I traced the bigger egg onto the pink and white chevron paper and then layered a couple of other patterns to "decorate" my egg. Finally, I used a small flower punch and added a brad to the center and placed it on the Easter Egg. I also free-handed a couple of clouds (I have an addiction to clouds) and then cut the sun with SCAL.


Products Used:
Cardstock: The Paper Studio
Patterned Paper, Cute Cuts, Stickers: Bella Blvd.
Brads: The Paper Studio
Punch: Marvy
Rick Rack: The Paper Studio
Pen: Zig Memory System
So now, I am actually up to date for the challenges this week!! These have been a lot of fun and who doesn't love using Bella Blvd goodies on their layouts??!! I am looking forward to the next two days and the challenges that Shannon will be posting!
Tuesday, February 21, 2012
Playing with Paper
Bella Blvd is having a fun, challenge filled week! Today's challenge was to use patterned papers from 4 or more collections on your project. For my page, I used papers from Finally Fall, Christmas Wishes, Family Dynamix, and Spring Flings and Easter Things. This was such a fun challenge and I love companies who create collections where you can mix and match the papers and embellies. It makes your supplies go so much further.


I also combined this challenge with one of the newer challenges at Club CK, that was started by Erika H. at the beginning of this year. The challenge is called Thanks Living and we are encouraged to keep a daily journal with statements of things we are thankful for. I actually just got started with my journal this week. Things have been a little crazy over the past two months, but I've kind of had a break in the clouds and the opportunity to get started with this challenge.
Here is the story of why I created this page, based on one of the statements in my Thanks Living journal: This page is about Ewok, who has been in the family before DH and I even got married. My sister in law actually ended up bringing him home with her as a puppy, because the original owner took him and left him on the side of the road. He went to live at DH's grandmother's house because she needed a watch dog and had a huge yard for him to play in. He was always such a sweet dog and loved attention and having the kids play with him. He ended up passing away last week on Valentine's Day, because he had been diagnosed with cancer last year. I was so thankful that we got to snap some pictures of him on Thanksgiving Day and we were able to print them out yesterday and take them to Tyler's grandmother to help console her, because she has really been missing him since last week.
Now, I am usually the type of person who tries to stay detached from pets, because I know how difficult it can be to lose one. I've seen my grandparents go through 3 dachshunds in my lifetime and it was always so sad when each one passed away. But I will have to admit that I had a soft spot for "Wok", which is what we called him most of the time, and I shed a few tears last Tuesday when they had to put him to sleep.
I wanted to get this page completed pretty quickly today, so instead of spending so much time on the design of my page, I decided to use a sketch by Diana Fisher that she created for the Imaginisce Blog.

Products Used:
Cardstock: Die Cuts with a View
Patterned Paper, Stickers, & Chipboard Alphas: Bella Blvd.
Pen: Sakura
Pearls: Recollections
Buttons: Michael's
Baker's Twine: The Twinery
Embroidery Floss: Janlynn
Teeny Alphas: Glitz Design
Monday, February 20, 2012
I Love Your Silly Face
We had a great One Page sketch to work with this week for Sketch Support! Allison added a large heart shape to the background of the sketch, behind the photo area. Instead of going with a solid-shaped heart, I chose to cut a heart outline on my Expression and then fill in the inside with varying sized circles.


I changed the photo area on this sketch to two photos, instead of three. The pics weren't the greatest because I took them on my phone, while we were in the car, but I changed them over to Sepia and I think that made a big difference. I used the MME paper pack "Love Nest" on this layout. There are some great glittered and textured papers in this pack. I also added a little extra texture to my page by cutting some smaller hearts, embossing them with a wood-grain pattern, and popping them up with pop dots.
Products Used:
Cardstock: Bazzill
Patterned Paper: My Mind's Eye
Thickers: American Crafts
Corrugated Alpha: Jillibean Soup
Punches: Marvy & Anna Griffin
Embroidery Floss: Janlynn
Embossing: Sizzix & The Paper Studio
Sunday, February 19, 2012
Sweet On You
I can't believe that Valentine's was just this past Tuesday and I've already finished three layouts from our Homeschoolers Valentine's Day party! But before I get too excited, I have to remember those photos I still have un-scrapped from Easter 2011!! :) I worked on this layout for two challenges: 1. Workout #62-XOXO at ScrapFIT and, 2. the Friday Sketch Challenge at Bo Bunny. I have had some of the Bo Bunny Valentine's papers in my stash forever and then I received a few more papers and some embellies from my LSS for my DT assignment. Well they went along perfectly for this challenge! And the challenge at ScrapFIT was to add some "X's" and "O's" to your layout.


The sketch for the Bo Bunny challenge was created by Allison Davis of Sketch Support, who just so happened to select little ole me as one of her DT members this year!! :) I kept the basic design from Allison's sketch, but I moved the title into the journaling area. I stuck with the two 3.5x5 photos, but skewed them a little, instead of having them straight side by side. I did A LOT of fussy cutting from the Bo Bunny papers. The scroll work, bird cages, birds, larger hearts, and smaller hearts that spell the word love, were all cut from the papers. I cut the "X" "O" border using SCAL and welded each letter together. Then I used a Prima acrylic stamp and some white acrylic paint to stamp a small text across the black cardstock. I finished it off, by stitching some pink embroidery floss through the "X's".
The funny thing about both of these photos, is that my daughter had a mouth full of candy in each one!! They wanted to open and eat everything that they received from their friends as it was given to them. Needless to say, they were high on sugar most of the day!! :)
Products Used:
Cardstock: Bo Bunny & Bazzill
Patterned Paper, Brads, Stickers, Ribbon & Pearls (Gabrielle Wrap): Bo Bunny
Thickers: American Crafts
Teeny Alphas: Glitz Design
Fonts: Arial Black & Scrap Baby
Acrylic Stamp: Prima
Acrylic Paint: Apple Barrel
Baker's Twine: The Twinery
Embroidery Floss: Janlynn
Friday, February 17, 2012
Summer Shower
TGIF!! Hopefully everyone has had a great week, but if not, hey the weekend is almost here so get ready for a little R & R! And if things are going really good for you this weekend, maybe you'll even get a little time to sit down and work on some layouts or projects!! If you do, come stop by Frosted Designs today and check out our Fabulous Friday challenge to use Brads and/or Eyelets on your layout or project. I love using Brads on my layouts, so this was a fun challenge to work with.


I used several of the small Bazzill brads to create the look of raindrops falling from the cloud embellishments. And I also used some of the copper-toned brads from The Paper Studio in the centers of the circles that I fussy cut from some Jillibean Soup papers. I really had a lot of fun designing this page and actually submitted it to one of the Scrapbook Trends calls, but never got a response...but oh well, I still ended up with a fabulous page that I absolutely love!! :)
To create the umbrella for this page, I used my Expression to cut an SVG file and then traced it on a piece of white paper. Then I drew off the umbrella sections, cut each one and then re-traced it onto the Jillibean patterned paper. I cut out each of the sections and then matched them in place on my SVG cut piece. I added the dark brown stitching to give each of the sections a little more definition and then dressed it up with the pom pom trim, baker's twine, and button at the top.
For the word "Summer" in my title, I also cut the word on my Expression. Then I placed the negative of the word on my background paper and used orange acrylic paint on bubble wrap to stamp in the word. Then I went back and outlined each letter with the marker side of my brown Zig pen.
So don't miss out on this fun challenge!! You can win an awesome prize from our Sponsor this week!! And be on the lookout at the beginning of March as we start welcoming the newest Team members to Frosted Designs. We have a lot of very talented women on this Team and I am very honored to work with each one of them!!
Products Used:
Patterend Paper: Jillibean Soup & Bella Blvd.
Pom Pom Trim: October Afternoon
Embroidery Floss: Janlynn
Brads: Bazzill & The Paper Studio
Acrylic Paint: Apple Barrel
Thickers: American Crafts
Baker's Twine: The Twinery
Buttons: Michael's
Tools: WRMK, Provo Craft, Sizzix
Pen: Zig Memory System
Font: Coaster
Adhesives: 3L Scrapbook Adhesives, Recollections, Zig Memory System
Wednesday, February 15, 2012
You Have My Heart
I actually got to sit down today and work on a page...and actually get it finished all in the same day! I incorporated 3 challenges into this layout (which I haven't done in a while). I used the sketch for the My Mind's Eye Blog Challenge 32 and also Case File #6, at CSI. The last challenge I used for this one, is the Jan./Feb. Issue Challenge #8 at Club CK, which was actually posted today. The challenge was to use one of the techniques from the 25 Ways to Use Stickers on Your Layouts article. I chose technique #3, which was to ink the edges of your sticker and create a dome effect using dimensional glaze. I used diamond glaze over the MME banner/date stickers.


For the Evidence portion of the CSI challenge, I chose to use 2 patterns with the same color and wood accents. My journaling was written from the aspect of the inspiration word, "comfort". For the MME sketch, I rotated it to fit the portrait aspect of my photos.
I hope you find a little bit of inspiration from my page or maybe from one or more of the challenges mentioned here. Make sure you stop back by on Friday to see my layout for the upcoming Fabulous Friday challenge at Frosted Designs.
Products Used:
Cardstock: The Paper Studio
Patterned Paper, Brads, Stickers, Pom Pom Trim: My Mind's Eye
Ink: Memento
Embossing: Sizzix & The Paper Studio
Thickers: American Crafts
Mini Market Stickers: October Afternoon
Font: Hypewriter
Dimensional Glaze: Diamond Glaze
Embroidery Floss: Janlynn
Tuesday, February 14, 2012
Two "Love"ly Layouts
Happy Valentines Day, everyone!! I hope you get to enjoy a day with your sweetie or maybe indulge in some yummy chocolates! Today, I am spending my day celebrating Valentines with our church's Homeschool group. Last year, we decided to get together and let the kids exchange Valentine's and planned to do it again this year. Hubby and I don't really ever have any special plans for Valentine's Day, because we feel like we celebrate Valentine's together all year long. :) I know, mushy right??!!
Okay, now on to the layouts. I thought since today is all about LOVE, I would share two layouts that follow along that theme. The first is one I created as one of my DT assignments for my local Scrapbook store, Scraphappy Pensacola. I got some of the BoBunny goodies, from their Gift of Love collection and used them today with some of the photos that I took of my oldest daughter getting her Valentine's ready for the party. I loved the big shaped heart and sometimes those kinds of shapes can be overwhelming, but I think it worked great layering all of my other page elements over the heart.


Products Used:
Patterned Paper, Stickers, Brads: BoBunny
Baker's Twine: The Twinery
Faux Pearls: Recollections
Punch: Marvy
The second layout, is for the weekly issue challenge at Club CK. Our challenge this week, was to use a calendar on our layouts. I've had these cute little calendar sheets from Jenni Bowlin forever and I knew that it would work perfectly for this challenge. I also scraplifted this page, from the front cover of the CK March/April 2012 issue. I loved Maggie Holmes "Sweet Baby" layout as soon as I saw it and her design was a great way to get my page done quickly.


My sister in law gave this stuffed puppy to our son 2 years ago for Christmas and ever since then, it usually goes everywhere with him and is always with him at nap time and bed time. I love that he has a "friend", because neither of the girls ever had that one toy that they were attached to as toddlers, so I think it's sweet to see my little boy have a special stuffed animal.
That's all I have for now, but I hope you enjoy your Valentine's and that you have a "love"ly day!! :)
Products Used:
Patterned Paper: Echo Park & October Afternoon
Puffies: KI Memories
Calendar: Jenni Bowlin
Buttons: Blumenthal Lansing
Brads: Bazzill & The Paper Studio
Punch: Marvy
Thickers: American Crafts
Clear Tiny Type: Cosmo Cricket
Embroidery Floss: Janlynn
Pen: Sharpie
Sunday, February 12, 2012
Cutting It Close!!!
Normally, I don't like waiting til the last minute to get a layout done, but this is the first chance I've had to squeeze in my page for CSI's Case File #5. The challenge closes later tonight and I've actually had this page planned since the Case was posted, but I could never find the time to sit down and do it. But I managed to have a little extra time today and fortunately had some coordinating products for this one and I ended up getting it done pretty quickly.


This month started a new selection of inspiration photos and I really liked the color scheme for this week's challenge. From the evidence category, I chose to use leaves, corners, and creating a border out of small elements (the small rub-ons from October Afternoon). I journaled from a back story perspective, for the Testimony portion of the challenge. These photos offered a perfect opportunity to tell about my son's picky eating habits. He was so difficult to feed as a baby. Sometimes he would only drink an ounce or two from his bottle, but if you tried giving it to him a few minutes later he would throw a fit. We usually ended up having to make a whole new bottle and then he would drink the whole thing!! When we moved into the baby food stage, he refused to eat it at all. He didn't even like the fruits!!! Even now, he won't eat things he doesn't recognize and he WON'T let you feed him at all...IE, putting something on his fork and trying to put it in his mouth...nope, doesn't go for that. I'm sure this is all just a stage he is going through and in the near future, he will probably be eating us out of house and home!!
Products Used:
Patterned Paper: Glitz Design & October Afternoon
Stickers & Rub Ons: October Afternoon
Acrylic Stamps: Close to My Heart
Thickers: American Crafts
Font: CK Jolly Elf
Ink: Tim Holtz
Pen: Sharpie & Zig
Edgers: Provo Craft
Tuesday, February 7, 2012
Throwing in a Double Pager!!
I used to feel like I needed to do a double page layout for everything. When I first started Scrapbooking, I had these rules that somehow got in my head that I thought I needed to follow. Double page layouts for everything and I also liked to mirror my pages and carry over any element or color that was on one side to the other!! :) Well, one day I had an epiphany and realized, hey there are no rules in Scrapbooking! So, I actually did a 180 and started creating almost all single page layouts. I find that they are so much easier to design and I feel more comfortable with a single page, instead of spreading out my design across two pages. But with that said, there are just some events that require a double page layout. And who better to go to for some amazing double pagers than Sketch Support??!! When Allison sent us the sketches to work with for February I knew that I definitely wanted to use the Two Page Sketch #25 for the photos from one of my daughter's Girl Scout activities.
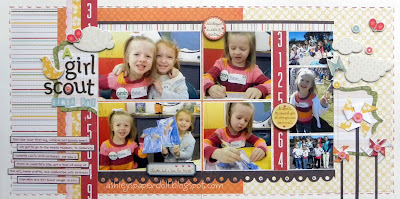

This sketch was pretty perfect for the photos I wanted to use, so I didn't really change up very much on this one. Here are some of the variations from the sketch:
Products Used:


This sketch was pretty perfect for the photos I wanted to use, so I didn't really change up very much on this one. Here are some of the variations from the sketch:
Variation #1 - I made most of my changes to the sketch, in the sizes of the photos that I used. Instead of the two 2x2 and one 4x4 on the left page, I used a 6x4. I also changed the 3 photos on the far right hand side from two 3x3 and one 3x2, to two 2.75x2 and one 2.75x4.
Variation #2 - I added border strips above and below the photo grid.
Variation #3 - I stitched along the perimeter of the page.
Variation #4 - I added a frame (mat) behind the title and the pinwheels (which I added in place of the flowers on the sketch).
Variation #2 - I added border strips above and below the photo grid.
Variation #3 - I stitched along the perimeter of the page.
Variation #4 - I added a frame (mat) behind the title and the pinwheels (which I added in place of the flowers on the sketch).
Variation #5 - Because of the size of my title, I moved the journaling strips down a little further on the page.
I hope you will head over and check out what my fellow DT members, Noey and Michele did with the sketch! There is some great inspiration so far this week!
Products Used:
Cardstock: Die Cuts with a View
Patterned Paper: October Afternoon, Crate Paper and Anna Griffin
Adhesive Chipboard: Cosmo Cricket
Brads: Bazzill
Thickers: American Crafts
Mini Market Stickers: October Afternoon
Stickers: October Afternoon
Font: CK Handprint
Edgers: Provo Craft
Embroidery Floss: Janlynn
Pen: Zig Memory System
Adhesives: 3L Mounting Squares, Zig Memory System and Recollections
Saturday, February 4, 2012
In Scrapbooking, Holidays Last All Year Round!!
If you've been Scrapbooking for a while, then I think you would tend to agree with me, when I say the holidays never end!! You may be scrapping Christmas in July, Easter in October, and Halloween in January...like I did for this layout! :) I do actually like to scrapbook some of the holidays at the time they are going on, because it puts you in the mood to get those pages done. But it is usually always impossible for me to get them all finished up in that time frame. I don't stress about it too much, but I do try to set a goal of having each holiday finished up before it takes place the next year.
I have had a lot of fun so far, getting our Halloween photos onto layouts. We talked the kids (miraculously) into theme costumes this year, so they kind of all matched...two pirates and a mermaid. We decided to dress them up a few days before Halloween and do a little photo shoot, to get some good photos of them in their costumes. I thought they would probably be way to hyper to actually pose for photos on Halloween night. :) These are some that I got of our little boy...quickly I might add, because he doesn't like to sit still for photos! So these ended up just being the kind, take as many as you can and hope for some good ones!! And I really LOVE the way they turned out, because out of about 25 of him, these 3 were the best. I did this page for one of the fun challenges that takes place at Club CK, called Chinese Whispers. We are put into groups and our host chooses a sketch, that is sent to the first person in the group. She does her layout based on the sketch and then sends her layout onto the next person in the group, but that person doesn't see the original sketch. This continues throughout the group, until we get to the last person and then we have a reveal, showing how the layouts changed from person to person and from the original sketch. It is a really fun challenge and I love participating in it each round.


Products Used:
Patterned Paper: Echo Park & My Mind's Eye
Thickers: American Crafts
Chipboard Alphas: Making Memories
Font: CK Fraternity
Ribbon: Pink Paislee
Stitching: Singer
Embroidery Floss: Janlynn
Edgers: Provo Craft
Acrylic Paint: Apple Barrel
Mini Round Gems: Recollections
Other: Chipboard Frames, Zipper, Clip, Staples
Friday, February 3, 2012
All Tied Up!!
If you've been waiting for the new Fabulous Friday challenge at Frosted Designs, then today is the day!! Our challenge this week is for you to use Ribbon/Twine on your layouts or projects!! There are so many fun options for this challenge! Now I have to admit, that I don't use a lot of ribbon on my pages (very rarely). I find it to be a little bulky sometimes, but on the other hand, I am a baker's twine fanatic!! :) I love to use twine and you can usually find it on about 90% of my layouts. Here is what I created for this week's challenge:


I really had a lot of fun creating this page! I started out with a $1 kit from Cosmo Cricket's Togetherness line, that I picked up at my LSS. These papers were perfect for an outdoors-y layout. I used my Expression to cut a large butterfly from the bottom right corner of my page and I covered the positive image of the butterfly with strips that I cut a scallop border on, using some paper Edgers. I thought it would be fun to tie the yellow twine across the page and meet it in the center of the bottom butterfly. I also used a little more twine for the center of the second butterfly. My Singer hand-held sewer has been on semi-good behavior lately, so I used it to sew a little border around the scalloped frame on my page and then I finished it off by adding some specks of brown acrylic paint.
I hope you will plan on coming over and playing along with us this week for the chance to win a great prize from our sponsor this week, Memorable Seasons!!
Products Used:
Kraft Paper: The Paper Studio
Patterned Paper: Cosmo Cricket, October Afternoon, Bella Blvd.
Adhesive Chipboard: Cosmo Cricket
Thickers: American Crafts
Font: Rustler & Hypewriter
Acrylic Paint: Apple Barrel
Edgers: Provo Craft
Baker's Twine: The Twinery
Buttons: Michael's
Brads: The Paper Studio & Bazzill
Punch: Marvy
Thursday, February 2, 2012
I Love This Hobby!!
When I have a photo like this one, it just reminds me so much why I LOVE Scrapbooking. It's not a photo from a big event or any special occasion, just one of my son in his car seat with a huge smile on his face and his bright, blue eyes sparkling!! But I am so glad I have this photo, because that moment, with that exact smile, at that exact age is something that will never be repeated again. How amazing to have the photo and be able to document it and have the memory preserved!!


I also had the chance to incorporate two challenges into this layout. The first challenge is the Jan./Feb. Issue Challenge #6, which is posted each week at Club CK by my friend Erika. Our challenge was to create a hybrid layout. This was a great challenge and almost everyone of my layouts usually incorporates my computer in some way. I had the Little Boy collection from Echo Park, so I used it for the traditional aspect on my layout. I also have a ton of digi files and several of them are from Echo Park too. So I printed some of the digi elements from the Sidewalks collection-clouds, flowers, and tags (which I added the words to)-printed them out and added them to the page.
The second challenge is Workout #61 at ScrapFIT, to use a blank canvas...basically starting with a white background. I hardly ever used white backgrounds in the past for the base of my layouts, but I've found recently that I really like it. It just makes the patterned paper colors pop and everything looks so crisp and clean!
Thanks for visiting today and I hope you will have time to check out these fun challenges this week or maybe find some different ones to participate in and get your creative juices flowing!! :)
Products Used:
Cardstock: Die Cuts with a View
Patterned Paper & Stickers: Echo Park
Digi Elements: Echo Park
Fonts: Scrapbaby & Brady Bunch
Brads: The Paper Studio
Embroidery Floss: Janlynn
Subscribe to:
Posts (Atom)